Monday, September 28, 2009

Recycled Historic Timber Frame Re Assembled

One of the coolest features of our house project is the recycled timber frame.  We purchased the frame from a house that was being torn down in Central New Hampshire.  This frame formerly lived at 431 Main Street, in Rumney, NH, where it was built somewhere around 1850.  More research is needed to fill out the history.  For many years it was home to Guy and Allitia Poitras, and was passed on to their sons, David and Ethan.  It had been run down for years, and was set to be torn down when discovered by Jean-Paul Downs, of Legacy Timber Frames.  This structure was disassembled and brought to our building site for a little less than $16,000.

This frame  was originally 20' x 40', and the church beams front and back ran the whole 40' length in one piece!  The original corner posts were 6", and a little light for our desired 10' ceiling height, so we located 8" x 8" corner posts from a barn in Peacham, VT, built around 1890.


Our floor plan is 30' by 30' on the inside, so the 40 footer's were cut down to 30', and one of the long beams had to be repaired, and joined in the middle.


Here's the first part of the frame erected;  these are the uprights on the south side.


 The timber frame progressed quite slowly during late summer and into the fall of 2008.  We had an exceptionally wet summer, so we lost quite a few days to rain.  Here's the frame in late October, 2008, with Linda in the South doorway.  Note the tall ceilings.


Here's Earl Bancroft using a router to cut in dovetails for the wind braces.


Mutt & Jeff.  Here's Caroll "Tate" Ainsworth, left, and Jean-Paul Downs, right.  Tate did a magnificent job with all site work, excavation and drainage, and is our favorite local Viking.  If you want to give him grief for driving a metallic flake pink dump truck, go ahead, make his day.  Jean Paul did the timber framing and general contracting.


Now that's a pretty truck!


Eventually, the walls were framed, and the roof rafters were up.  This is pretty much where things stood when work stopped in mid-December, 2008. Note the Trusses are 2 x 12's sistered onto the old 4 x 6 roof rafters, for 16.5" cavity for dense cellulose fill.  This will result in R-63 or so, plus the sheathing inside and out, for a total cap R-value of around R-65.  We probably won't add sheet foam on the inner surface to get this up to R-72.


Concrete and ICF Walls

Pouring Concrete:

Once the drainage was in place, we were ready to start pouring concrete (as little as possible!), to create the root cellar, and support the bale walls to come.


Here are a few more photos of the process.  First the footers below the ICF walls of the root cellar/basement.  Here's Jean-Paul Downs filling the forms.


Here's the ICF (Insulated Concrete Form) blocks, assembled, and ready to pour.  There are PVC pipes running through the walls for plumbing and electrical service. those to the left are for the solar heating system (much more later), while those to the right are for electrical and phone lines from the existing house.  the plan is for a grid-tied solar electric system with a battery backup.


Jean-Paul and Sean pouring concrete into the ICF forms for the root cellar.


Here the root cellar is poured, the rubble-filled trench has been prepared for the 12" tall by 22" ICF forms to support the bale walls, stacked and ready in their bright blue wraps.


Ready to pour the concrete beam.


Here's what holds the walls up.  Black Locust  is used instead of pressure treated lumber.  12" Thick by 22" wide concrete beam with 2" foam insulation on inside and out.

Now we're ready for the timber frame!

Back To The Beginning...

Here are a few scenes from the beginning of this project.  What we can't show are the 4 years of discussion and design that led to this building.  At first we planned to renovate the highly unusual building in which we live -- a former farm building with a crane built into the ceiling!

After digging into the roof, floor, and walls, as well as trenching along the north wall to add insulation to the poured concrete, we realized that there were so many unknowns dealing with the old building that we had no way to predict what problems we'd run into -- or how much we'd have to spend.  Basically, we had a building with very little insulation, no proper frost walls or footers, and a slab poured right onto the dirt with no insulation below.  To create a highly-insulated and highly-efficient building, we'd have to jack it up and build a proper foundation under it, with no idea what the cost would be.  We decided to build new.

After considering a tight, super-insulated stick-built "cube" -- ugly but high functioning -- we decided on straw bales for the best mix of sustainable construction, energy performance, and for being so downright cool.  Suddenly the enthusiasm for building new went through the roof -- a timber frame/straw bale house could be so beautiful, so green, and such a nice place to live, that we were all abuzz.


Sitework  and drainage:


    • Most straw bale buildings are found in warmer and drier places than Northeastern Vermont.  Building here would have to be quite a bit different than New Mexico or Nebraska.  Our summers are warm and sometimes wet, but our winters are long and bitter cold (so far).  We average about 40" of rain per year, anywhere from 80" - 130" of snow, and roughly 7,900 heating degree days.
    • Drainage is very important to keep water out of the walls, and we paid a lot of attention to the details.
    • We wanted to minimize the use of concrete -- an unsustainable material with a LOT of embodied energy.  The walls would be supported by a 12" tall by 22" wide poured ICF concrete "beam" built atop a rubble filled trench with filter fabric and perforated pipes to lead water out to daylight down the nearby steep bank.  Many thanks to Jean-Paul Downs and Carrol Ainsworth for this design and fine execution.
    • The soil on the building site is just about perfect for this sort of building -- stony glacial till with coarse gravel and sand with excellent drainage.
    • We needed a little more room for mechanicals than our mechanical room would allow, and we wanted to incorporate a root cellar, so we had to dig down.  We decided on a 10' x 15' "basement" under one corner of the house, using ICF blocks to achieve R-20, and to minimize the volume of concrete needed.
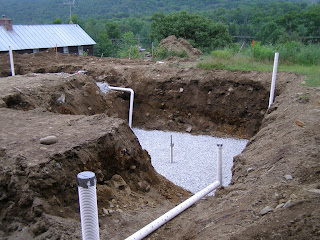
    •  These photos show the excavation, the crushed stone for drainage, the 4" perforated PVC pipes below the crushed stone to conduct water out of the trenches, and the vertical pipes that can be used to flush the system.  These pipes all lead underground until they come to daylight to the west at the base of a steep bank.  Landscaping filter fabric is then placed over the stone to act as a filter to keep fine silt from clogging up the works.  Our current house -- the former farm out building -- is in the background in some photos.
    • The day after the excavation was complete, we got 13" of rain in 2-1/2 days.  The photo with the excavator on the edge of the deep hole shows how little damage this caused.  We had to shovel away a little sand and mud off the landscape fabric, but amazingly, the vertical walls did not crumble.